
If you ever want to have a "spiritual" experience while photographing something, try Milky Way photography. Going out into the darkness, setting up the camera on the tripod and spending the next few minutes dialing in the settings while having a background filled with crickets and coyotes is a beautiful thing. Unfortunately, some beginners treat Milky Way photography as a forbidden object. Photographing the Milky Way is super simple. It was one of the earliest things I went after when I began shooting. Over time, though, I have learned what I could do better in the field. Here I will detail many techniques that have taken my images to a new level. Although the information is out there, this article is a collection of tips, tricks, and techniques that I have learned to reach that level.
THE GEAR
When it comes to photographing the Milky Way, there is a basic “must have” list of gear that you will need. There is also an “I should probably have it” list, along with an “I will think about it” list. While I will list pretty much everything I use, it is not the “end all, be all” of Milky Way photography.
Of course, the first piece of equipment is the camera. I have seen plenty of comments online from photographers bemoaning the noise issues of their crop sensor camera bodies. Truth is, yes, crop sensor cameras may suffer from issues that full frame cameras do not. It is just the nature of the beast and the difference in technology. There are several different methods for shooting the Milky Way, and some of those methods are well suited for those of us with crop sensor bodies. More on that later.
The most important feature a camera should have is the ability to manually adjust the shutter speed, aperture and ISO. Photographing in manual mode is the only way to shoot the Milky Way. I will get more into this during the second part of this tutorial.
Now if you have nothing more than a kit 18-55mm lens, don't fret--you can still shoot the Milky Way with it. I have successfully created several images with my kit lens. They were decent, but nothing compared to what I do now. If you want to be somewhat serious about photographing the Milky Way and do not want to spend a whole lot of money, Rokinon has become known as the go-to lens manufacturer for astrophotography because they produce affordable, wide-angle f/2.8 glass. The only drawback, if you can call it that, is that the glass is manual focus only, but for the Milky Way, we do not need auto-focus. I have the 14mm glass, and it works great for astrophotography. I also use it from time to time for landscapes and weather.
The last piece of gear you need is a quality tripod. When describing tripods, the words “cheap” and “great” do not go together. At a bare minimum, a good, entry level tripod that will last will cost you at least $150 if you can find a deal. You will want to make sure that the ball head is quality also. I use a Vanguard Alta Pro 263AT tripod. It is on the lower end of the cost spectrum for quality tripods, but it has served me well.
Lastly, you will want some light. You can find cheap headlamps online or at your local Walmart or discount store. I also have a collection of small flashlights. You will be working in the dark, so you need some light source to get set up.
WHAT SHOULD I HAVE?
Although most cameras have a shutter timer and you can successfully create sharp images using nothing more, I definitely recommend a remote for your camera. When it comes down to wired or wireless, I think it is more personal preference more than anything. Wireless remotes can be had for just a few bucks, but the downfall of them can be the battery. They usually take the flat, round type batteries that can be somewhat difficult to find at times. There have been several occasions that I have been on location and had a dead battery in my wireless remote. I prefer a wired remote. I do not have to worry about batteries going dead on me while shooting. They tend to cost a little more, but they are definitely worth it.
With the popularity of smart phones over the last few years, there have been numerous apps created that will help you greatly with Milky Way photography. Warning: I am an iOS person, so the apps might not be available for Android users.
Here is a list with a quick description of each app: Star Walk 2 – Star Walk 2 is great for planning and finding the Milky Way. The app displays celestial objects in the sky and their location. The app allows the user to scroll through time and date so the user can determine where they need to look and time. The app can also take into consideration the user's location and it has an augmented reality function. Get Star Walk 2 here https://itunes.apple.com/us/app/star-walk-2-night-sky-map/id892279069?mt=8
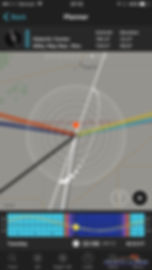
Photopills – This app has possibly set the gold standard for useful photography tools. I can write an entire article about this app, but I will keep it short. The app can be used to plan a Milky Way shot. It is not as “visual” as Star Walk, but it allows the user to set a location on the map and the user can scroll through a time chart, which will display where the Milky Way is and times that it is visible. That is the bare bones description of the app. It is so much more than that, and even if you do other kinds of photography in the outdoors, it is very, very useful. http://www.photopills.com/
NEXLAB – I have not seen much written about this app as of yet, but I would consider this one a hidden gem that is very useful. The app displays weather models from the College of DuPage. That might sound weird for astrophotography, but one of the forecast tools included is for cloud coverage. In short, I can pull up the model and scroll through the timeline to see if the sky will be clear at the location I wish to shoot at. I would not call this app user-friendly, but it is not difficult to use. This information is also available through the College of DuPage's website. https://itunes.apple.com/us/app/nexlab-models-for-iphone/id1063874502?mt=8
My Clear Sky Charts – With this app, the user can pull up locations throughout the US to see what the clear sky forecast is for that location. Information includes Cloud Cover, Transparency, Seeing, Darkness, Wind, Humidity, and Temperature. It is a pretty solid app, but there might be a few hours between updated forecasts. https://itunes.apple.com/us/app/icsc-clear-sky-chart-viewer/id877416121?mt=8

THINGS THAT I MIGHT WANT TO HAVE
The first thing is two light stands and they need to be able to rise about seven feet into the air. I include light stands because I have started to use Neewer CN-160 LED panels in my Milky Way photography. These panels are somewhat small, and they are very affordable. I picked these up to learn how to implement “low-level lighting” into my night photography. I will go into detail on how to use these panels in the second part of this tutorial. For about $30, you can purchase one panel and each panel comes with a CTO (color temperature orange) slide in panel. For shooting the Milky Way, you will need the CTO panels. The great part about these panels is that you can also use them to light paint objects such as vehicles, and while on location, they double as work lights. https://www.amazon.com/Dimmable-Digital-Camcorder-Panasonic-Samsung/dp/B004TJ6JH6 LET'S PUT IT ALL INTO USE
One of the key things to keep in mind is the time of year. Here in the United States, the core of the Milky Way is above the horizon during the night from early spring to fall. The window is roughly from late February to early October. The one thing to keep in mind is that everything rotates, so when the core starts to become visible in the spring, it is visible in the early morning hours right before sunrise. As the year grows long-in-the-tooth, the core will be visible earlier and earlier until fall when it is chasing the sun through the sky. The other thing to keep in mind is the position of the core. When it first starts to become visible, the core is going to be in a mostly east direction. Later on in the year, right before it disappears, it will be visible towards the south, south west.
The next thing you will need to consider in planning a Milky Way shoot is the moon phase. You can forget trying to shoot the Milky Way during a full moon. The illumination from the moon will drown out the Milky Way. The best time to shoot is during a New Moon phase, and to a lesser degree right before and right after the phase. The moon will not have enough illumination to drown out the Milky Way during these times.
This is where Photopills and Star Walk can help you out. With the ability to scroll through time, you can visualize where the core will be on any given date and time while taking your location into account.
Now that I have the Milky Way's position sorted out, where can I go? Is there an interesting terrain feature such as a lake or an abandoned house that I can use in the image? Where can I setup in relation to that object and the Milky Way? What about light pollution? Will I have to drive several hours from the city? Or do I live in a semi-dark region where I can drive for just a couple of minutes and start shooting?
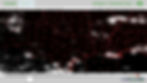
Head over to https://www.lightpollutionmap.info and zoom to your location. The map will show you areas where light pollution is prevalent and its intensity. The one thing to keep in mind is that even if we're going to be 20, 30 miles from the nearest town, if we are shooting towards that town, we're going to pick up some light pollution. Remember, the camera sensor captures light and the longer the sensor is open, the more light it will gather. Yes, that small town might provide some air glow to your image so plan accordingly. It is not a deal killer by any means, but something to keep in mind.
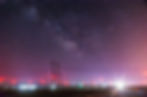
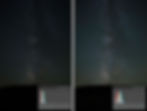
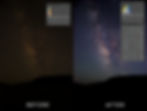
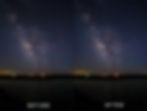
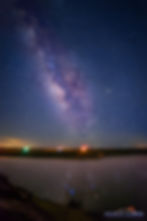
In the following image, even though it had a lot of lights, with some basic adjustments in Lightroom, I was able to bring out the Milky Way in this shot.
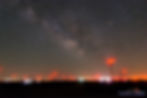
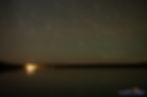
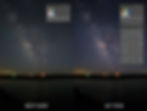
Now with this image, even with basic Lightroom adjustments, it is hard to make it pop because of the lights. To keep things even, back when I took these two shots, I was pretty limited in my post processing skills. I wonder what my current skillset could do to them?
So now we have planned our shoot and we are at our location. It is time to dial in the appropriate settings on the camera. The first thing you need to do is make sure everything is in manual mode. Manual focus, manual settings. We use manual focus to prevent the camera from hunting focus during shooting. If your camera and/or lens has vibration reduction, make sure it is turned off.
What about JPEG versus RAW? I have always shot RAW for everything that I have done, and with Milky Way images, it holds true. There is so much more that can be done with a RAW file compared to a JPEG that it makes sense. Please keep in mind though if you shoot JPEG and do not post-process, then you are going to be limited in what you can do with the final image. It goes without saying that with Milky Way photography, post processing is a vital step to produce a pleasing image. When we are shooting, we are using techniques that induce a lot of noise into the image file, and noisy images can make or break an image. Also, depending on your camera body, you might be able to get away with minimal post processing (you full frame folks) or you might need to do work (us old crop sensor folks).
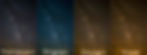
With Milky Way photography, white balance seems to be taken with a more subjective eye than other genres of photography. That is to say, you will probably see a more varying difference in white balance between photographers. The thing with white balance with Milky Way images is that it can really help you make adjustments that help out the image a lot. In the following image, I have a sample of four different white balance settings applied to the same image. If you really pixel peep, you might see some parts of the Milky Way appear brighter than in other white balance settings.
I use a custom white balance setting in camera using 3800 Kelvin. If you have Lightroom or ACR and a Milky Way image, set the white balance to Fluorescent and you will see that it is 3800 Kelvin. Even though you can get away with having the white balance way off in camera if you are shooting RAW, I do like to have a pretty accurate representation when I am reviewing the images on the camera's LCD screen.
Just remember that if you are creating an image that is going to have an illuminated foreground, the white balance will more than likely be noticeably off for portions of the image. If you have greens such as grass showing up, the greens are going to be bluer while the Milky Way looks perfect. More than likely though, if you are just starting out and do not have any lights to illuminate the ground, then the ground will appear as a silhouette and be black, so you will not have to worry as much.
Now for camera settings. Refering to the exposure triangle, we remember that the subject determines what setting takes precedence. If we're shooting action, then we need to have a fast shutter speed, and we open the aperture up to compensate, and then the ISO to get where we need to go. If we are shooting landscapes, then the aperture takes priority, shutter speed is adjusted to compensate and we keep the ISO as low as possible.
Milky Way photography is a little different. Yes, we open the aperture as far as it will go, but we have to be cognizant of our shutter speed. Everything in the universe is spinning around. While we cannot see this with the naked eye, the camera will pick up on it. Further more, the focal length comes into the equation. So if we leave the shutter open for too long, we're going to induce “star trailing” into our images and the Milky Way will start to blur. So we have to compensate by turning up the ISO.
Although the following image is an extreme example with the shutter open for 628 seconds, this is a good example of a star trail.
The first thing you want to do is go into the camera menu settings and turn down the LCD brightness as far as you can. Because we are shooting in the dark, the screen will be bright and having the brightness up too high can led us to make exposure setting adjustments that can hinder the images.
For lens focal length, you will want to use the widest lens that you have in your inventory. Dial in the shortest focal length you can. Focal length affects the shutter speed we will have. There is a tendency to have the longest shutter speed possible for the focal length, which is great. The one thing we have to keep in mind though is star trails. Because the Earth rotates, if we leave the shutter open for a decent amount of time, our stars will develop trails. We want our stars to be sharp as possible. This is where the 500 rule comes into play.
The 500 rule can give you a good foundation to figure out your baseline. The formula looks like this: 500/focal length = shutter length. So if we are shooting at 14mm, that number would be 36 seconds. But wait, that is for a full frame camera. What about a crop sensor body? The number definitely will change, depending on the crop factor of your camera. If you do not know the crop factor of your camera, Google it real quick and you will find the number. Once you have that number, use this formula: focal length x crop factor. This will give you the adjusted focal length. Then plug that number into the 500 rule formula and it will give you the baseline shutter time. Now here comes a big old "but" to the 500 rule. The 500 rule was developed back in the days of film. There is a newer formula, called the NPF Rule. This formula is way more complicated than the 500 rule. Here is a link that will help you or confuse you more: https://petapixel.com/2017/04/07/npf-rule-formula-sharp-star-photos-every-time/
Let's say I am going to use my camera, a Pentax K-5 II with the Rokinon 14mm to photograph the Milky Way. Since my camera body has a crop sensor, I'll first use the formula 14 x 1.5 (crop factor) will equal my true focal length. I then plug 21 into the 500 rule and the suggested shutter time is 23 seconds. I can tell you from real world experience, using a 20 second exposure is fine, but it can be better. Where this manifests itself is when you can look at the image enlarged. Even on a large monitor (I used a 24" monitor), there might be some minor signs of star trailing with a 20 second image. I just received an 18" print of a 20 second Milky Way image, along with a couple 12" prints of 10 second exposures and there is definite trailing in the 20 second image, whereas it is not so pronounced with the 10 second images.
The NPF Rule, when it is implemented, will suggest a shorter shutter time, which will force you to raise the ISO. This might not be the best thing to do depending on your camera body, so the answer is to this great, confusing mystery is to "shoot for post processing" while creating an aesthetically pleasing image. If you want to create just one image and perform some minor post processing in Lightroom, use the 500 rule. This will allow you to keep a long enough shutter speed hopefully without relying on really high ISOs, which can destroy the file. If I am only shooting for one image to use, then I will take several shots at differing exposures just so I am not left to rely on one image that might not be that good of a base to start with. If I am shooting so I can median stack, then I like to use a shorter shutter time coupled with a higher ISO setting.
Keep in mind, watch your histogram during the process, which I discuss a few paragraphs below. But do not be afraid to experiment out in the field.
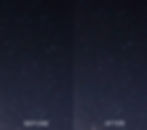
The following two images offer a more realistic look at what we will be dealing with when it comes to shutter speed, with just seconds of a difference between two shots at the same focal length:
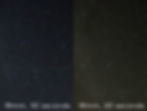
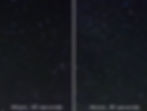
It might be hard looking at the comparisons to see any trailing, but if you zoom in and really do some pixel peeping, it is there. To the average viewer though, they might not see it. In fact, the 18mm, 30 second image has been printed and sold.
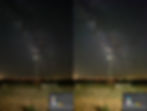
So now we have our shutter speed. We have our aperture wide open, but what about the ISO? With Milky Way photography, we need to use the histogram to determine where we are with our exposure. Unlike shooting other genres of photography where we want everything in the middle, for the most part, the histogram with a Milky Way image will be on the left because it is so dark. We want to aim for a histogram where most of the image information is just off the far edge of the left side. Down below are several examples of images that I have shot over the years, with their corresponding histograms. The first two images are from several years ago when I was stuck shooting with my 18-55mm kit lens. The images are straight out of camera with only white balance adjusted so it is the same across the board. As you can see from the histogram and the examples, there is a lot of information to work with in the second image. That does not mean the first image is a throw away. You can definitely adjust it to have a decent Milky Way image.
The following image is more recent and was shot with my Rokinon 14mm f/2.8 lens. Each image was shot using low level lighting. If you compare the first image with the first image above, the only difference in exposure is the aperture. You can see the difference having a wider aperture will have on a Milky Way image. The second image was one of my first using ISO 12,800 and a 10 second shutter speed. As you can see, there is a pretty good difference between the two exposure wise. With the ISO 12,800, you might be able to see a lot more noise in the image. I shot this with median noise reduction in mind. Even if you do not want to median stack, or can process the noise to an acceptable level with one image, then that is a pretty decent image out of the gate.
Focusing in the dark can be stressful at times. There are several ways, depending on where you are located, that you can use for focusing. We are going to be shooting in Live View, so what we need to do is zoom in on something that will allow us to acquire the focus. In my local area, there are a lot of ground lights from farms. I will usually zoom in on one of these lights and adjust the focus until that light is sharp. If I am in an area that is devoid of any ground lighting, then I will use a flashlight to illuminate an object on the ground so I can see it through the LCD screen. I will then acquire focus from that.
Once I have focus and camera settings, then I take the test shot. I will make the appropriate adjustments based on that test shot. Can I open the shutter for a little longer? Do I need raise the ISO? Do I need to adjust the camera for composition? Once I feel confident, then I will shoot the final image, or images.
The final image will more than likely have a dark ground while the appearance of the Milky Way is pretty decent. Once you feel confident with the images you are producing, you might want to start using some advanced techniques.
LIGHT PAINTING
Full disclosure: I am not a big fan of light painting landscape or objects unless I am using an LED panel. The reason for this is because the quality of light tends to be okay at best. The difficulty of “painting” a nice, even light across the scene is somewhat high.
We already have a flashlight with us, so we can use that. Basically, what you do with the flashlight is to “paint” the foreground while the shutter is open. This takes practice though. You will have to do some test shots with the flashlight while the shutter is open to dial in your timing.
The other issue with light painting with Milky Way images is white balance. Even though we might have it dialed in for the Milky Way, our flashlight might have a color temperature that makes the greens appear to be blue. This has to be fixed in post processing and if your skills are basic, it might give you some difficulty.
This is one of my feeble attempts at light painting a Milky Way image. As you can see, the ground suffers from a white balance setting that is no good, while the Milky Way white balance is just about perfect.
LOW-LEVEL LANDSCAPE LIGHTING
I came across this technique awhile back and in my opinion, this technique, when used properly produces some of the best looking images. The technique was developed by Wayne Pinkston and Royce Bair. The only drawback to this technique is the gear used. With light painting, we can get away with a smaller type flashlight. With low-level lighting though, it requires at least one LED panel and some way to mount that light, which in a lot of cases means a light stand. Not a big deal if you are shooting near your vehicle, but if you have to hike to a location, you have to haul the gear. You can visit the LLL website http://lowlevellighting.org/
In the gear section, I listed the Neewer CN-160 LED panel and light stand that rise to at least seven feet. I have two panels and the scene will dictate just how many lights you will use. I have used just one, and I have used both lights. There are other LED panels on the market, but I went with the Neewer panels because they were affordable. The other benefit to these panels is they come with CTO (color temperature orange) slide in panels. Just like gels with flash, the panel changes the color temperature of the light being emitted.
I mentioned in the light painting section that using a flash light can cause white balance issues with the final image. With the LED CTO panels, we do not have that issue. I mentioned that I used 3800 Kelvin as my white balance for Milky Way images. I keep that white balance, but with the LED panels, it gives my illuminated object the proper white balance. Instead of making the adjustments with selective post processing, I have made it while shooting, therefore any minor adjustments afterward cover the whole image and everything is right where it needs to be.
So we are on location, how do we set this up? The first thing is to create our composition. It could be a windmill, flower, trees, or just the landscape itself. The next thing we do is position our lights to illuminate the scene. The Neewer LED panels have a tremendous amount of light spill, so I will raise them up as far as the light stand will go (seven feet). I will then aim the panel up into the air at about a 45-degree angle. Sounds crazy, but with the spill of the light, the ground right in front of the light will be illuminated.
The power setting for the lights can be somewhat confusing, but it needs to be turned down as low as it will go. Even at this setting, there is enough light being put out that after our eyes are adjusted to the darkness, there is enough light being put out that we can actually do work. If I am using two lights, I will make sure that the coverage from one light does not overlap with the other light, in essence giving me a hotspot in my scene.
Now I will take a test shot to check on light placement. Once I am happy with it, then I will begin shooting the images that I want. Since I have started utilizing the low-level lighting, I have been shooting some images with a 10-second shutter speed and ISO 12,800. This setting provides me with an image that might be a little too bright straight out of the camera, but I can adjust that in post. I have also shot images with a 20-second shutter speed and ISO 6400. In both instances, the low-level lighting was just about perfect. Now remember that I use an aperture of 2.8, so if you are using glass that does not go as wide, or goes wider with its aperture value, then you will need to take test shots to dial in your exposure.
If you were like me when I first started shooting, I would use one image and that was it. I would go home, post process and call it good. Recently, I learned a new to me processing technique that I highly recommend. It is called median stack noise reduction. I will write more about it in the third part of this tutorial, but if we want to use this method, then we have to shoot for it while on location.
When using median stack noise reduction, we take a series of images, load them into Photoshop and utilize median stacking for noise removal. Out of all the methods of noise reduction that I have used, I have liked this one the best for Milky Way photography. It has allowed me to raise my ISO to levels I never used while shortening the time the shutter was open. What I do on location is I will take a series of images, usually about 10. I will raise the ISO to 12,800 and lower the shutter speed to 10 seconds. Once I am home, I will load about 7 of them and process them. One warning about median noise reduction, it does take some computer horsepower, so you might want to stay away from it until you have a computer that can handle the load.
So there you have it. Part one covered the gear, part two covered a basic starting point for Milky Way photography. Part three will cover post processing. I will cover several different ways to post process your Milky Way images, from basic Lightroom adjustments to advanced techniques.
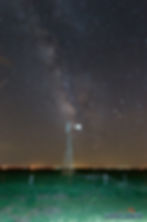
The following image illustrates why I have fallen in love with low level lighting. I used only one light for this image. All I have to do is setup the light, illuminate what I want to illuminate and forget about the light until I am done shooting. The way the light lays across the subject is even and I do not have to worry about painting that even light while the shutter is open. The only tradeoff between this and light painting is I have to carry a light stand and LED panel whereas with light painting, I can carry the flashlight in a pocket.

POST PROCESSING
There is no one, sure fire method for post processing a Milky Way image. In fact, there are several different methods that work just fine. The question on processing rests with the photographer. Maybe basic adjustments in Lightroom is just fine due to personal preference or because that is the only software the person has. Or the photographer can use advanced techniques within Photoshop. In this section, I will cover some post processing techniques that I have used over the years.
LIGHTROOM
For whatever reason, Lightroom is going to be the software package of choice from start to end. While Lightroom is very powerful, it is also limited. Although you can do some selective adjustments with graduated filters and the adjustment brush, things can quickly get out of control.
Here is before and after using Lightroom only using an image from my wayback library. I used my kit 18-55 with a 30 second exposure, f/3.5 and ISO 1600.
The final image is okay. For sake of simplicity, I used a little noise reduction for the final image, but because I had been outside shooting for a while, the sensor is warmed up and the edges of the image suffers from noise related to it being warm.
Here is a more recent image that I shot. I used my Rokinon 14mm at 20 seconds, f/2.8 and ISO 6400. As you can see with the histogram of the base image, it is a better overall image and it allowed me, even with the most basic Lightroom adjustments to create a final image that is pretty decent.
If you want to follow along, here is a quick video showing adjustments being made to the image:
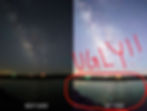
The thing to remember when it comes to Milky Way images and post processing in Lightroom is your dark areas or shadows. If they are crushed in the base image and your camera is not ISO invariant, then you might want to leave those areas alone, or even crush them just a little more. Those of us with cameras that are not ISO invariant, if we try to raise those shadows, we might be left with a noisy, ugly mess. The example below shows what I am talking about.
PHOTOSHOP
Let's say you have Photoshop and really want to dive into the post processing aspect. As with anything else, your knowledge is the only limit when it comes to Photoshop. Perhaps you just want to add a little noise reduction, or you want to enhance the image a little bit. There is a lot more flexibility in Photoshop that will allow you to do basically anything you want.
One of the easiest things is to start with is noise reduction. I have the Nik Software Suite and within them is Dfine 2, which is a noise reduction tool. It is a very effective tool if you want to have a powerful, yet simple way to reduce noise. It operates in layer masks, so if you are familiar with how they work within Photoshop, then you will have no problem getting up to speed faster.
Here is a zoomed section of the same image, a before and after of using Dfine2 for noise reduction:
Another method for post processing in Photoshop is the use of luminosity masks. Luminosity masks can being very confusing, but are very powerful and once you learn how to use them, even on a basic level, you will fall in love with using them. There are several different tool panels out there that will make using luminosity masks a breeze. I use and recommend Lumenzia. The user friendliness, along with the support is awesome.
Here is the same image that I have used throughout this particular section, after I have used Lumenzia for some tweaks.
The last method I will discuss is the median stack noise reduction method. Since learning how to use it, I have fallen in love with it. There is a learning curve that goes along with it though. The first thing you have to consider is that you have to shoot for it. This means that while you are on location, you will have to take several shots, I usually go for about 7-10 shots. Using this method though, I can lower the shutter speed a little, while raising the ISO. For me, I have found 10 seconds and ISO 12,800 to be a good base. You can play around this while shooting to find your happy spot.
Now before I go too far in describing this method, I have to warn you, this method is not for computers with low horsepower. Even though I have a custom built machine (and some specs are going to be changed between writing and publishing this article), I only have 8gb RAM on board and this method can cause things to grind to a halt. I have found a way around my power limitations so I can still use the method, but I have to be careful with how many images I use. Right now, I stay between 7-9 images.
Median stacking is simply using a stack of several different images and "merging" them together to form one image. Median stacking considers all the values of a pixel at a given location across the stack, and then the process chooses a final value based on that median result. Yeah, kind of confusing, isn't it?
So once I have returned home, I will take my series of images and apply a basic Lightroom adjustment across the board. I will then export that series as LAYERS to Photoshop. Once in Photoshop, the workflow looks like this: Select all layers and then duplicate them
Create a Smart Object with the duplicates, then turn them off while I work on the original set
With the original set, turn them all off except for the top one
Create Layer Mask and mask out the foreground
Duplicate the Layer Mask to each layer below and turn on those layers
Align the layers
Delete the Layer Masks
Select All the layers and create a Smart Object
Up Top, click on Layer-Smart Object-Stack Mode-Median
Repeat the Previous Step for the Duplicate Layers
Create Layer Mask on the duplicate layers and mask out the sky
I learned this process from watching this particular video:
Once I have ran through this process, I will then go into processing the image using some of the previous methods I have discussed. If you have a computer that might be lacking in power, instead of exporting the images straight from Lightroom, you can export them into a folder as .TIF files. Shut down every program except Photoshop, then import the files into Photoshop and go about it that way. Currently, it takes me probably 2-3 minutes to stack a group of 7-9 images.
CONCLUSION
While Milky Way Photography can be daunting and confusing to many beginners, in fact it is pretty simple. In this article, I have discussed some basics, which you can stay with. I have also covered some advanced aspects of it. Even though time is getting short here in the Northern Hemisphere to shoot the Milky Way until next spring, feel free to commit the information to memory so when you decided to go out and photograph, you will have a good base to start from. When it comes to post processing aspect of Milky Way photography, there is no right way and no wrong way. It's all about your ability to create an image that achieves the result we are looking for, grabbing the viewer's eyes.
RECOMMENDATIONS
Throughout the article, I have reference several apps and tools that I use, not only for Milky Way photography, but for a lot of the photography I do. If you step outside and want to capture a great sunset, then several of these apps can definitely help you out. Lumenzia is the panel that I use for working in luminosity masks. You can check out it on Greg Benz' website here: https://gregbenzphotography.com/news/lumenzia-v4. Greg has put together a lot of great videos showing how it works, and if you purchase it, you will have more videos to access. Along with that, Greg runs a Facebook group dedicated to luminosity masking and you will be able to find more great material there. Washington based photographer Nick Page puts out a bunch of great material and has several excellent tutorials that cover luminosity masks and astrophotography post processing. Nick's tutorials are to-the-point and easily understood. You can find his tutorials on his website here: http://www.nickpagephotography.com/tutorials/astrophotography-post-processing